
DIY 5 Minute Decal Transfer on a Pitcher - the perfect way to revamp and give a new chic look to plain white pitchers in just 5 minutes!
With all the craziness in our daily life, quick and easy DIY projects are on top of any of my lists right now. I have tons of other more intricate projects waiting in line, in different painting or photographing stages but just cannot find the time to finish them all.
As I was looking through some older posts the other days, I realized that I mentioned in one of them that you can use waterslide decal paper to quickly give a new look to a pitcher. But I haven't really showed you how easy it was to do that!

DIY 5 Minute Decal Transfer on a Pitcher
You will need a lovely white pitcher and waterslide decal paper with your favorite French image. I used one beautiful French ephemera from The Graphics Fairy, my favorite place in the world to find simply amazing free French graphics. Yours too, right? :)

Because of the rounded curvy shape of the pitcher you will need to cut your French graphic in several smaller pieces, as close as you can to the edges of the actual writing. If your pitcher has a more straight/linear shape you can skip this step and just apply the decal like I did in my DIY 5 minute decal transfer on a coffee cup, another quick and easy, but beautiful project.
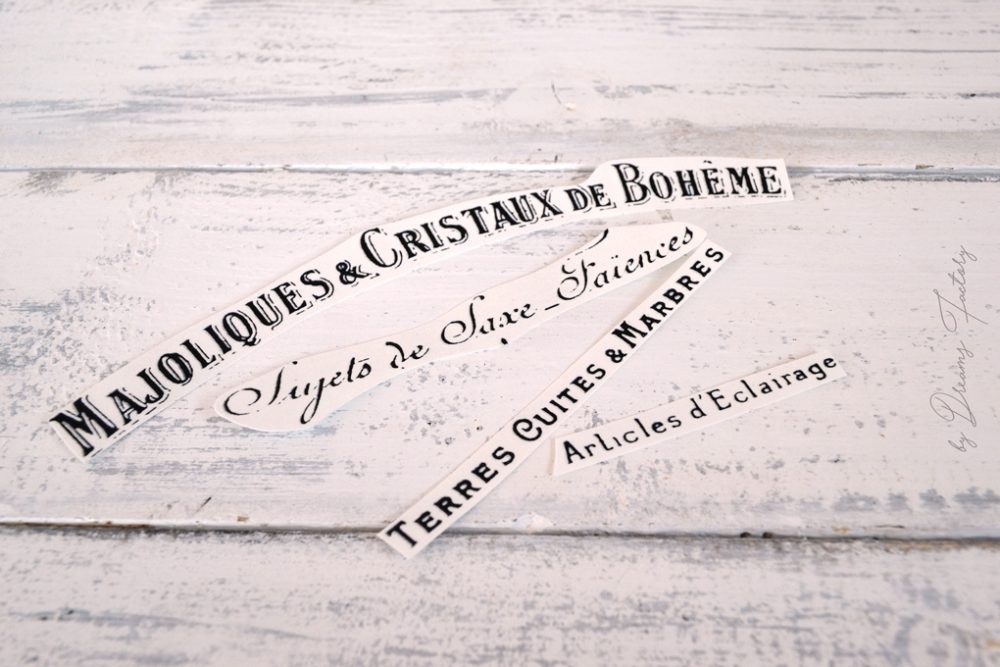
The cutting in smaller pieces part will give you a better control when actually applying the decals and will help you avoid any wrinkles and air bubbles.

You know you only need water to apply the decals, right? This is the most amazing way of decorating and personalizing any object, if you ask me!
So if you are new to my blog or you want to learn more about this technique, you can find here all about waterslide decal paper transfers.

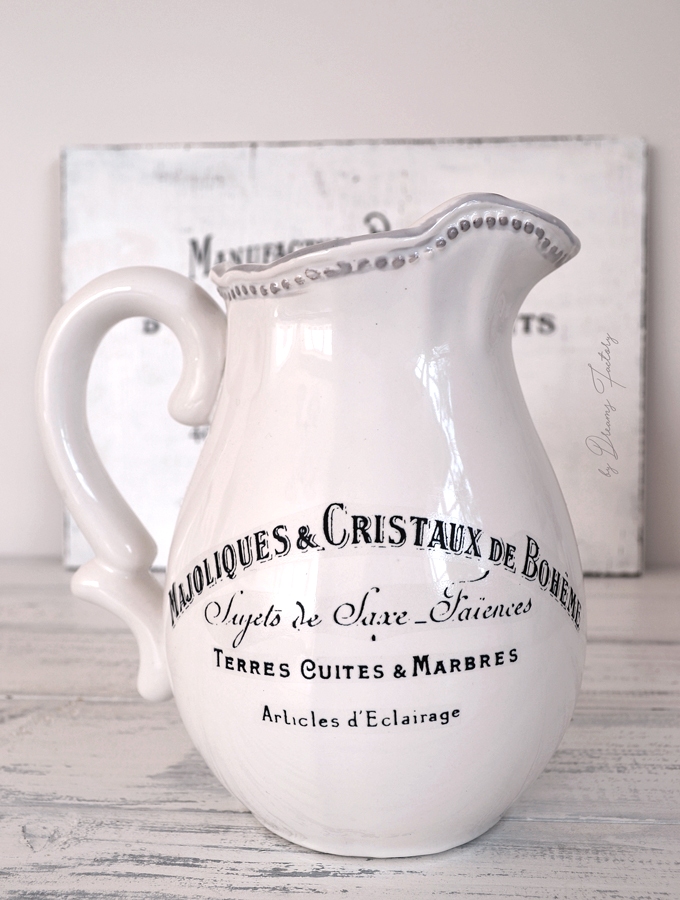
I only decorated one side, just in case I would ever needed to use the pitcher plain and simple, but you can decorate both sides of your pitcher with different French graphics (or anything else that you can think of). The choice is all yours!
I didn't use anything to seal the decals before nor after applying them, but make sure you read the instructions of your decals, some inkjet decals might require using a sealer before applying them.
A lot of people asked me about how would the decals look in time, after using the decorated objects and if they would come off when washing the object.
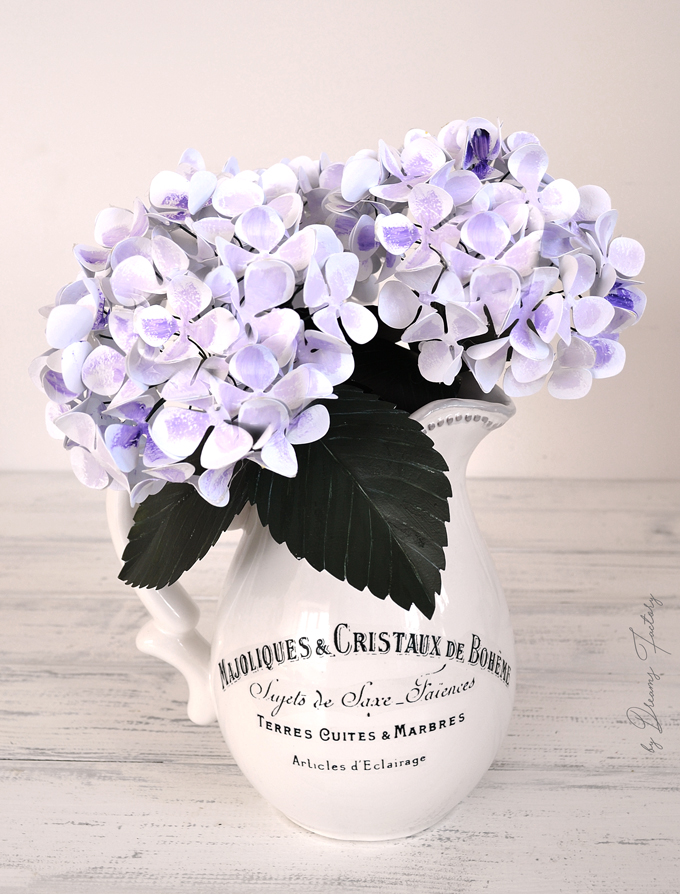
To answer these two questions, I'll tell you a little secret! I decorated this pitcher almost 2 years ago and I frequently used it all around our home with fresh flowers, greenery, dried lavender or even small decorative tree branches. I used it for photo shooting different DIY projects on the blog and never had any problems with it. I usually wash it by hand with cold or warm water and gently wipe it afterwards with a damp cloth.
The decals look the same as they did when I applied them and I love my pitcher more than ever! :)

And here is the project I mentioned in the beginning of this post, the one that I made almost 2 years ago (time flies way too fast these days!!), these delicate paper hydrangeas that you can see in the pictures.
Don't forget to pin for later ↷

If you have any questions about my DIY 5 minute decal transfer on a pitcher, feel free to leave them below.
P.S. I also used decals to decorate these two enamel vases from Ikea - DIY French vases Ikea Hack

For more French transformations, make sure you check my Frenchified Projects and follow my Frenchified board on Pinterest.
If you make some projects inspired by any of my posts, please use them for personal use only. And don't forget, link back to my blog, or hashtag them using #bydreamsfactory or tag me using @bydreamsfactory on Instagram. Have fun! :)
Disclosure: This post contains affiliate links so you can easily find the products I love.
See more of my favorites {HERE}.
Sharing with lovely people at these awesome parties.
Pamela
Very cute.
Diana / Dreams Factory
Thanks, Pamela!
Cynthia Chilson Finger
So cute and sounds super quick and easy ... my two favorite things. Thanks for sharing!
Diana / Dreams Factory
Thank you, Cynthia! I LOVE quick and easy :)
Debrashoppeno5
I love this idea. I am going to be looking for cute white pitchers.
Diana / Dreams Factory
I hope you will give it a try! You can never have too many cute white pitchers :)
Michelle
Oh I remember your coffee cup from a few months ago and this one is as special Diana. The Graphics Fairy is the best online resource ever and you're a master and turning her graphics into something spectacular.
Diana / Dreams Factory
Michelle, you are too sweet, thank you!
With all the amazing graphics found on The Graphics Fairy, it's not that hard to be creative! :)
Lindsay @ The DIY Mommy
This is so beautiful! I love the technique you are using for the transfers. My mind is racing thinking of all the cute customized pieces that could be made :)
Diana / Dreams Factory
Thank you so much, Lindsay!
I know what you mean, I'm always in search of customizing something new ... or old :)
Jane
inspired to finally give this a try. just love how the pitcher turned out and the coffee mug
Diana / Dreams Factory
Hi Jane!
I hope you did ... or will! :) It's so easy to add chic details to and beautify any object!
Have a sunny week!
Denise
Dear Diana...my name is Denise, I'm from Brazil and I do love crafs.
I follow crafts at Pinterest and I found your link...I just want to say that I loved every art (DIY) that you have done, they are wonderful... and thank you for sharing <3
Diana / Dreams Factory
Denise,
I'm always happy to know my readers, thank you so much for your lovely message! ♥
Carol MacSween
I am wondering if I can use colour printed decals with this decal transfer or only black ink.
Thanks!
Carol
Diana / Dreams Factory
Hey Carol,
You can print anything you want on your decals, black 'n white or colored images work just as fine!
Chrissie
How do you seal these after the decals are applied? Polycrylic? A spray? Any recommendations?
Diana / Dreams Factory
Chrissie, I usually use a matte acrylic spray to seal both the decals and the surface they were applied on.