
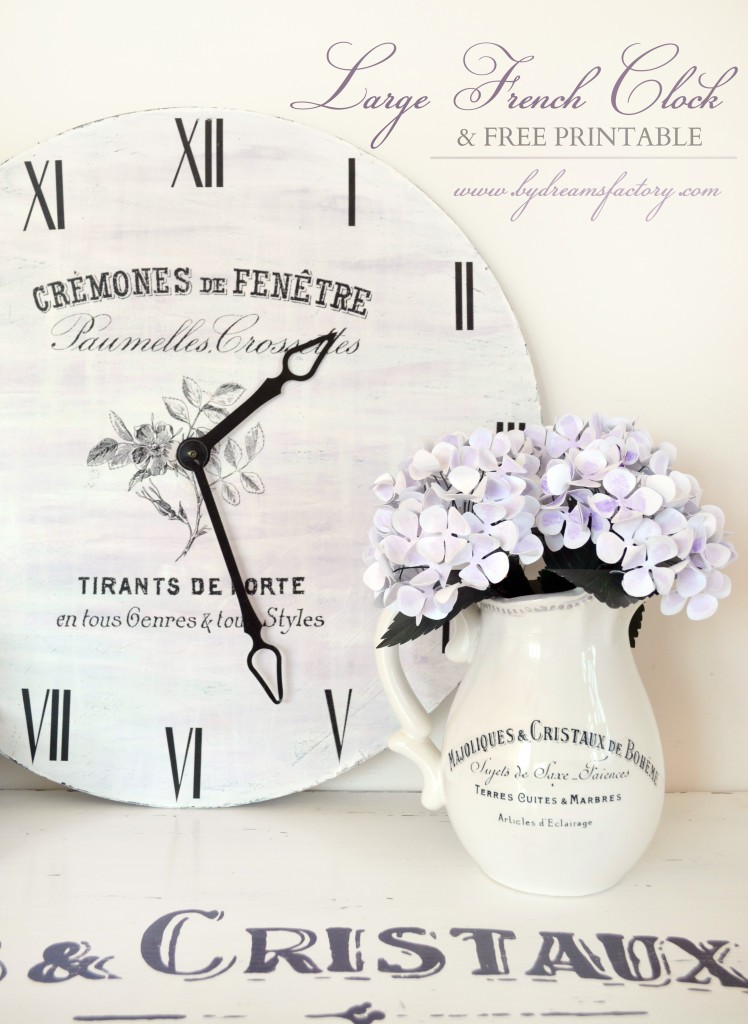
As I was looking through some old pictures the other days, I realized that I haven't showed you the most amazing project ever! :) It's a DIY large French clock that I made almost two years ago (time flies real fast these days, can you believe September is here?!!), and is definitely one of my favorite decorations around my home.


You might have already seen it in a picture (or two) on my blog, being so versatile it can be easily integrated into any French decor.

What you'll need
- a large round MDF plaque (50 cm diameter, 40 mm thick - you can buy a pre-cut board or cut one yourself using a jigsaw)
- a clock mechanism (you can find something similar here*)
- brushes, acrylic paint/milk paint/chalkpaint (use contrasting colors to get a Shabby Chic look) & candle wax, 180 grit sandpaper
- waterslide decal paper* for the image transfer
How to make it
You can paint the round MDF plaque in one of your favorite colors but if you are going for a really chippy Shabby Chic look, here is a tutorial on how to achieve that look using two contrasting colors, candle wax and sandpaper. For this clock I used black as my first colors and then white as my top color. I also dry brushed a little bit of lilac, one of my favorite colors, to add some depth... and to easily match it with the lilac tones I have in my home.
Finished painting already? :) Great, let's move to the next part, the image transfer. You know I'm a big fan of waterslide decal paper so I used decals to transfer both the images and the numbers.
I made this beautiful and elegant French wall clock face collage using some amazing graphics from The Graphics Fairy - French typography, a black and white ''sketched'' rose and even a beautiful clock face with Roman numerals.
This is how the DIY French clock collage looks like, if you are going for a smaller version of this clock, you can just download the picture below and use it as it is.

If you are going for the same clock size as I did, a diameter of 45-50 cm or something similar, I'll show you a trick I sometime use for printing larger images on decals: I split the large image into smaller 'pieces' and then compress and arrange all the resulted images (without the border in this case) so I can easily print them on A4 decal pages and use them on my project.
So for this project you will ONLY need two A4 pages and you will be able to make your own beautiful large French clock! How cool is that, right? :) This is my bulletproof method for printing larger images, especially that decals can be more easily applied when in small(er) pieces.
{If you are not familiar with using and applying decals, you can find here all about waterslide decal paper transfers.}


So after printing the images on the two decals, cut as close as you can to the images and numbers. zw2cuxbxt9f

Before applying the numbers, measure and mark (using a pencil) where the numbers will be. Begin with the cardinal points position and place the corresponding numbers there.

Continue applying all the numbers where you made the pencil marks.

Apply all the numbers, one by one, and check to see if they are aligned correctly.

Apply the decals with the French typography and the beautiful sketched rose.

Use and eraser and erase all the pencil marks that you made earlier, before applying the numbers. Install the clock mechanism following the manufacturer's instructions.

And enjoy the most amazing large French clock ever! :)

I really really really love the final result you get with waterslide decal paper*, but of course you can also use any other image transfer techniques (like medium gel transfers, hand painting, Mod Podge transfers, etc.).


The picture below is for Pinterest, you can easily save it for later so you won't forget to try this project :)

Hope you like my DIY Large French Clock and decide to give it a try. If you have any questions or just want to say 'Hi', feel free to leave a comment below :)
Don't forget to smile,
Diana
*This post contains affiliate links of products I love and recommend. See more of my favorites {HERE}.
POST SCRIPTUM
If you like the Hydrangeas and the pitcher used as props in the pictures above, learn how to make some on your own
DIY: DELICATE PAPER HYDRANGEAS AND A 5 MINUTE FRENCH PITCHER REVAMP

You can also see the clock ''in action'' in another project here:
 / TUTORIAL: VAZE FRANTUZESTI (TRANSFORMARE IKEA)")
Heather
Hi Diana,
What a fresh and lovely project. Your clock design is charming. Thank you for sharing the process & the images with us! Can't wait to make one for our dining room...
It's impressive that you publish all your posts in two languages! Must be a lot of work. Thanks for creating such an easy to follow tutorial.
http://thicketworks.com
Diana / Dreams Factory
Thank you so much for your lovely comment, Heather!
Please let me know if you decide to make it, would love to see how it turns out.
It is a little bit of extra work writing the articles in two different languages, I hope I will find the time to implement a multiple language plugin ... hopefully somewhere in the nearest future! :)
Thanks for stopping by!
XO,
Diana
Claudia
Wow! Nu stiu ce as putea spune mai mult decat ca e superb!
Poate sa adaug ca nu pare prea greu de facut si merita sa incerc .... candva :)
Diana / Dreams Factory
Merci mult, Claudia, si aici! Chiar nu e greu de facut, plus ca ai satisfactia ca l-ai facut chiar tu! :)
Kerryanne @ Shabby Art Boutique
Another beautiful project Diana! Thank you for sharing it with us at Shabbilicious Friday. I'm delighted to be featuring it at tomorrow's party.
Hugs ~ Kerryanne
Diana / Dreams Factory
Thank you so much, Kerryanne, can't wait to see all the shabbilicious features ♥
Jane
Thank you so much for this tutorial. I have a round table top that I kept to make into a clock, and pictured it looking exactly like this, but didn't know where to start. You have inspired me to get going. Do you have any tips as to how to make the hole in the centre?
Diana / Dreams Factory
Hello, Jane! Sorry for the late answer, I had some crazy busy days lately.
I'm glad you find my tutorial inspiring, I really hope your clock will turn out to be AMAZING! :)
You could use a driver drill to make the hole in the middle.
Please do share your project, would love to see the final result.
Best wishes,
Diana
Christina
Fantastic clock! I am about to make my first clock, using a wooden cabinet door that has a beadboard look, I would love to use the decal method for a French image transfer, which I found on the Graphics Fairy website.
I am wondering about the 'shine' of the transfer. If I put the black french text onto my chalk painted door, using the transfer paper, will I see the shine of the transfer, and thus, meeting the dull Matt of the chalk paint?
I don't want it to look like a decal stick on. How would I get it to blend in? Would I sand it? Or paint over? What did you do, as I couldn't see a shine on your clock.
Sincerely, Christina
Diana / Dreams Factory
Hello Christina!
You could use a matte finish sealer after applying the decals, but I suggest you try this first on a smaller surface and see how it goes, because it really depends on how thick is the decal paper and how matte is the chalkpaint.
I wouldn't recommend sanding after applying the decals - they will break.
I usually make sure to cut the decals close to the lettering and remove any excess blank paper. I also use a matte finish spray for my decorations.
If you need more details, please let me know.
Hope that helps! :)
JaneEllen
Can see reading your posts will keep me very busy, have loved every project of yours have seen. You and Karen of Graphics Fairy are such a perfect match.
Can remember when I found Karen's site was so thrilled and couldn't believe she gave away all those incredible images. Think was not too long after I found blogs, what an education I was in for, wow. Seems like years have flown since I did find blogs. Am always so impressed with all the talent out there. Sure keeps me very busy and happy.
Looking forward to following your blog also Diana.
Happy weekend
Diana / Dreams Factory
Thank you for your lovely comment, Jane Ellen!
I know what you mean about Karen and her amazing graphics, I had the same feeling (and still do) when I first discovered her blog. Her images were such an inspiration for me, even a starting point for finding my own style ... with a little bit of French chicness! :)
And yes, thank God for all the amazing bloggers who share their knowledge through their blogs, I've learnt everything I know about DIY and painting from blogs in a few years and even quit my job to embrace my new passion (that grew into a beautiful business in time).
So I guess the sky is the limit when you do what you love, right? :)